Set up the meal
Choose the restaurant, date, table shape, and who's dining.
Assign seats
Place each diner at their seat around the table.
Enter the bill
Add items manually or scan the receipt — quantities are detected automatically.
Allocate items
Tap an item, then tap the diner who ordered it.
Add tip & deposits
Choose a tip percentage — same for all or per diner. Deduct any deposits paid before the meal.
Pay & share
Mark each diner as paid and copy the full breakdown to share.
Settings
Configure this app to match your requirements
Currency
Choose from 12 supported currencies including GBP, USD, EUR, JPY, and more. All prices throughout the app — bill items, per-diner subtotals, and payment totals — are displayed in your chosen currency. The symbol and decimal formatting adjust automatically (for example, JPY shows no decimal places; GBP shows £).
Accessibility
Contains the Use Symbol Buttons toggle. When enabled, button text across every screen is replaced with SF Symbol icons, giving the interface a cleaner, more compact appearance. When disabled, buttons show their full text labels. The change takes effect immediately and persists between sessions.
Restaurant Search Radius
Controls how far the app searches for nearby venues when you type a restaurant name on the New Meal screen. Choose 5 mi, 10 mi (default), or 25 mi, or select Nationwide to search without a distance limit. Location permission is required for radius-based searching — the app will prompt you the first time a search is triggered.
Double-tap Speed
Sets the time window for the double-tap gesture on item chips in the Allocate Items screen. A double-tap instantly removes an item's allocation without needing to select it first and tap Remove. Choose Fast (0.25 s), Medium (0.40 s) (default), or Slow (0.60 s) — pick whichever feels most natural for your tapping rhythm.
Home Screen
Your meals at a glance
Starting a new meal
Tap New Meal to begin. You'll move to the meal setup screen to choose a restaurant, date, table shape, and diners.
Continuing a meal
In-progress meals appear under Recent Meals. Tap any meal to pick up exactly where you left off — the app remembers which step you were on.
Planned meals
Meals saved with a future date appear under Planned Meals. You can add diners and continue when the day arrives.
Completed meals
Finished meals show View, Hide, and a delete icon. View opens the final bill summary in read-only mode. Hide moves the meal to History — this is permanent and makes the meal read-only.
History
Tap History to reveal archived meals. You can View or delete them but not edit them.
Diners and Settings
Tap Diners to manage your saved frequent diners. Tap Settings to change the currency, restaurant search radius, and double-tap speed.
Setting Up a Meal
Restaurant, date, table shape, and diners
Restaurant name
Type the restaurant name. After 3 characters, a dropdown shows nearby venues — tap one to select it. You can also type a name freely if it doesn't appear in the list. The restaurant name must be filled before you can add diners.
Date
Today's date is pre-selected. Choose a future date to save the meal as a Planned Meal on the home screen — you can return to add diners and details later. Past dates cannot be selected.
Table shape
Choose from Rectangle, Square, or Round. This determines how seats are arranged on the seating screen.
Adding diners
Tap any saved diner to add them to the meal. Tap the person+ icon to create a new diner. Enter the diner's name and tap Save. Diner colours are assigned randomly. You need at least one diner to continue.
Continuing
Tap Continue to Seating to assign seats around the table, or Skip Seating to go straight to bill entry if seating isn't needed.
Seating
Place each diner at their seat
Dining group numbers
This app is designed for comfortably handling intimate groups of diners numbering between 3 and 10, which we find covers most group dining scenarios. However, we are aware that on those really special occasions, your diner list might exceed our normal in-app seating capacity. We recommend you follow these guidelines for larger than normal groups so you can still easily allocate bill items to everyone.
- Rectangular table — 12 guests max, using seats at both ends of the table
- Square table — 16 guests max
- Round table — 20 guests max
We realise that with larger than normal groups the table configuration might not be a true reflection of the restaurant layout, but it's a plan B we're delighted to offer.
Assigning seats
Tap a diner in the left panel to select them (they highlight), then tap a seat around the table to place them. Tap a seated diner to pick them up and reassign them to a different seat.
Rectangle table options
- End Seats: tap to cycle through None / Left only / Right only / Both — adds seats at the ends of the table
- Flip Sides: mirrors the top and bottom rows
- Flip Ends: swaps the left and right end seats
Square and round tables
Use Rotate to turn the seat layout 90° at a time. Square tables also have Flip Sides and Flip Ends — these move already-seated diners to their nearest matching position.
Reset
Tap Reset to clear all seat assignments and start over. The button is faded until at least one diner is seated.
Bill Entry
Add items manually or scan the receipt
Adding items manually
Tap Add Item to enter an item name, price, and quantity. Tap anywhere on an item row to edit it. Items with a quantity greater than one show the count inline (e.g. Lucky Saint ×3).
Scanning a receipt
Tap Scan Bill to open the camera. Hold your phone steady over the receipt — the app uses on-device OCR to read the text and AI to identify item names, prices, and quantities. The AI automatically joins two-line item names (e.g. a wine name split across two lines) and handles common OCR quirks like × being read as * on quantity markers.
Reviewing scanned items
After scanning, a review sheet lists all detected items with their prices and quantities. Tick or untick any items, then tap Add to add the selected items to the bill. If you scanned multiple pages and overlapping items are detected, a warning message displays requesting you check the list for duplicate items.
Rescanning the bill
Made a mistake and imported a long list of duplicates? Tap Rescan in the bottom bar to clear the current item list and immediately reopen the camera. This is only available once items have been added.
Tip check
Tap Tip check next to the subtotal to preview what the total would look like with a tip added — useful for confirming you're entering the right items before the service charge is applied. Choose 12.5% for the standard amount, or tap Amount to enter a specific tip value. This is informational only — the actual tip is set on the Bill Summary page.
Subtotal
The running subtotal updates automatically as you add or edit items. Tap Allocate Items when all items are entered.
Allocate Items
Assign each item to the diner who ordered it
Assigning an item
Tap an item chip to select it — it highlights in gold. Then tap the diner's avatar on the table minimap to assign the item to them. A confirmation message appears briefly at the top of the screen. A green checkmark on the chip means the item is fully allocated.
Diner avatar colours
The ring around each diner's avatar shows their allocation status:
● Red — nothing allocated yet
● Orange — some items allocated
● Green — fully accounted for
Sharing an item between diners
Select an item, then tap Share Item. Tick the diners who share it and tap Split Equally to divide the cost evenly between them. For items with a quantity greater than one (e.g. a round of drinks), a Custom Split option lets you assign a specific number of units to each diner using steppers — the app prevents over-allocation and warns you if the full quantity is going to a single diner when others are present.
Removing an allocation
Tap an item to select it, then tap Remove in the bottom bar. Or double-tap an allocated item chip to remove it in one step.
Split Equally (all items)
If no items are allocated, a Split Equally banner appears. Tap it to divide the entire bill equally among all diners in one tap.
Reset
Tap Reset to clear all allocations and start over. The button appears once at least one item has been allocated.
Bill Summary & Payment
Tips, totals, and marking everyone paid
Deposits
If diners paid a deposit to the organiser before the meal, toggle Deposit paid on. Choose a quick preset. For example, if you have GBP selected as your default currency, your preset options are £5, £10 or £15. You can also tap Custom to enter any amount per person. The deposit is subtracted from each diner's total, so only the remaining balance needs to be settled on the night. The per-diner breakdown shows the deposit as a negative line between the tip and the total.
Choosing a tip
Select a tip percentage from None, 10%, 12.5%, or 15%. Toggle Same tip for all off to set a different tip percentage on each diner's individual card.
Per-diner totals
Each diner card shows their item subtotal, tip, and total to pay. Tap View on a card to expand the list of items they were allocated.
Marking as paid
Tap Mark as Paid on each diner's card as they settle up. The card turns green. Tap it again to undo if needed.
Copying the bill summary
Tap Copy Bill Summary to copy a formatted breakdown to your clipboard — ready to paste into a WhatsApp message or group chat.
Completing the meal
Once all diners are marked paid, tap Meal Complete. The meal moves to Recent Meals with a completed status. You can then tap Hide to archive it.
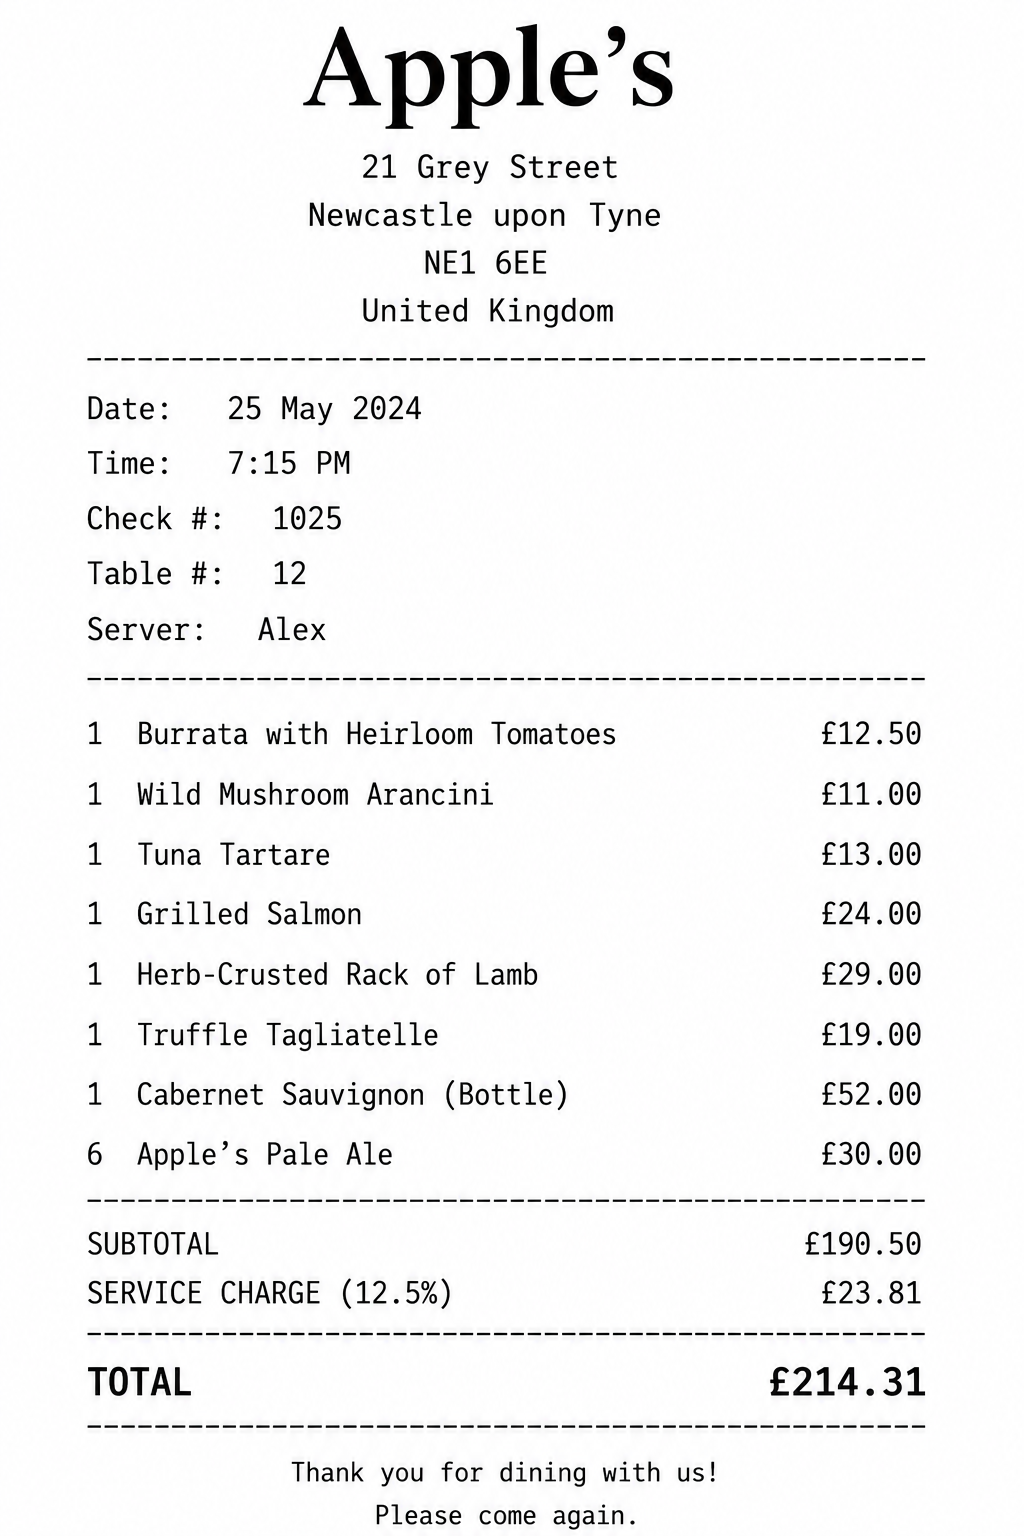
Sample Receipt
Try the app before your first restaurant visit
Just downloaded Dine & Divide and want to try it before your next meal out? Use this sample receipt to explore the scanning and bill-splitting features straight away — no restaurant required.
Pull up the receipt below on a laptop, tablet, or a second mobile phone, then use Dine & Divide on your iPhone to scan it — exactly as you would with a real restaurant bill. Tap Scan Bill on the Bill Entry screen and point the camera at the screen displaying the receipt.